1.WhatsApp Automation Course
PART-I
- Connect your account
- Set Up the AI Assistant
- Lead Collection
- WhatsApp Flows
- Sending info to Google Sheets
- WhatsApp Catalogs
- Appointment Booking
- Using the Live Chat
- Sequence Messages
- Broadcast Campaigns
- Shopify Automation
- Order notifications
- Abandoned cart reminders
- Cash On Delivery Verification
- Showcase collections
- WooCommerce Automation
- Order notifications
- Abandoned cart reminders
- Cash On Delivery Verification
⚠️ Important: What to do if your AI isn’t working
If you’ve followed the steps in this guide but your AI still isn’t responding, don’t worry—here are two quick things to check:
1. Check your AI token balance
At the top of your screen, you’ll see a token counter. If it’s red, it means you’ve run out of AI tokens. This can happen if your bot has been handling too many conversations or if your training data is too large.
How to fix it: This is a sign you’ve outgrown your current plan. Upgrade to Pro for more capacity and uninterrupted AI support.

2. Check the Error Bot Log
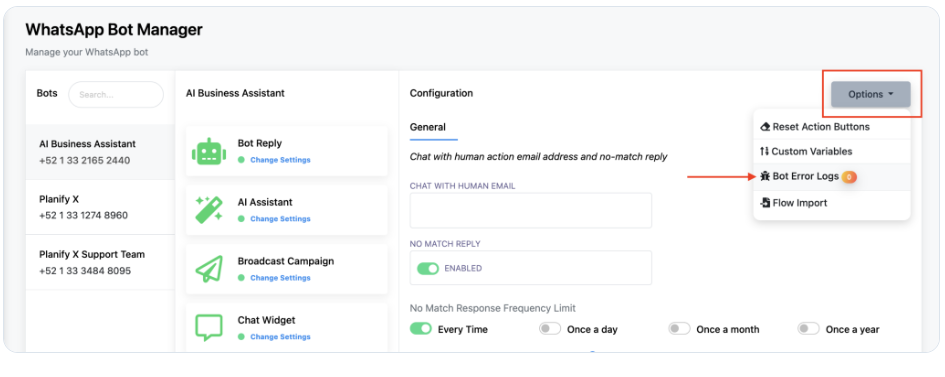
Sometimes the issue is a bot-side error. You can check this by going to the Bot Manager, clicking on Options, and selecting Error Bot Log. If there’s a problem, you’ll find a message explaining what went wrong so you can fix it quickly.
2.Facebook Automation Course
- Connect your account – 00:02:33
- Get Started Settings – 00:03:23
- Set Up the AI Assistant – 00:04:22
- Lead Collection – 00:12:46
- Sending data to Google Sheets – 00:17:40
- Create an interactive bot – 00:19:57
- Appointment Booking – 00:22:07
- Add a persistent menu- 00:23:44
- Automate commment replies – 00:24:57
- Broadcast Campaigns – 00:28:57
- Sequence messages – 00:30:46
- Using the Live Chat – 00:33:19
⚠️ Important: What to do if your AI isn’t working
If you’ve followed the steps in this guide but your AI still isn’t responding, don’t worry—here are two quick things to check:
1. Check your AI token balance
At the top of your screen, you’ll see a token counter. If it’s red, it means you’ve run out of AI tokens. This can happen if your bot has been handling too many conversations or if your training data is too large.
How to fix it: This is a sign you’ve outgrown your current plan. Upgrade to Pro for more capacity and uninterrupted AI support.

2. Check the Error Bot Log
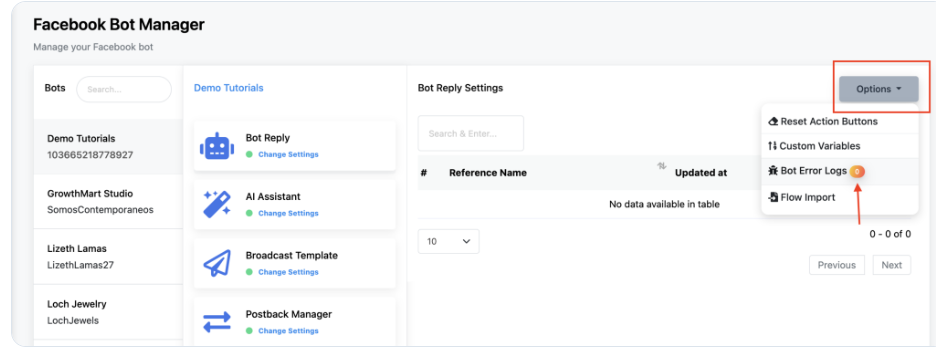
Sometimes the issue is a bot-side error. You can check this by going to the Bot Manager, clicking on Options, and selecting Error Bot Log. If there’s a problem, you’ll find a message explaining what went wrong so you can fix it quickly.
3.Instagram Automation Course
- Connect your account
- Create an interactive bot
- Lead Collection
- Sending data to Google Sheets
- Adding a persistent menu
- Setting Up the AI Assistant
- Automating commment replies
- Sequence messages
- Using the Live Chat
⚠️ Important: What to do if your AI isn’t working
If you’ve followed the steps in this guide but your AI still isn’t responding, don’t worry—here are two quick things to check:
1. Check your AI token balance
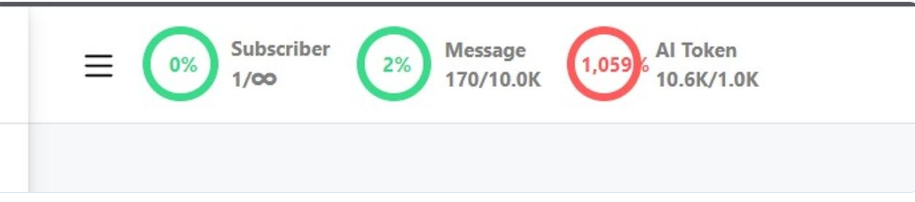
At the top of your screen, you’ll see a token counter. If it’s red, it means you’ve run out of AI tokens. This can happen if your bot has been handling too many conversations or if your training data is too large.
How to fix it: This is a sign you’ve outgrown your current plan. Upgrade to Pro for more capacity and uninterrupted AI support.
2. Check the Error Bot Log
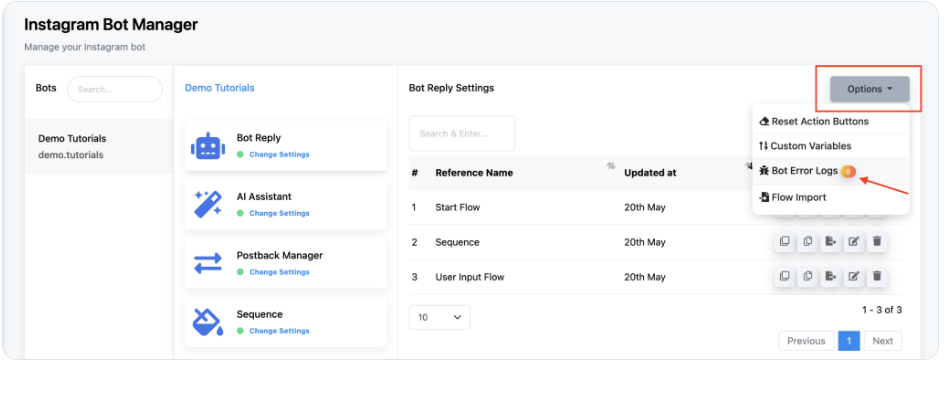
Sometimes the issue is a bot-side error. You can check this by going to the Bot Manager, clicking on Options, and selecting Error Bot Log. If there’s a problem, you’ll find a message explaining what went wrong so you can fix it quickly.
Telegram Automation Course
his course is expected to be published soon. In the meantime, you can check out the WhatsApp course for a guide to similar processes
Webchat Automation Course
This course is expected to be published soon. In the meantime, you can check out the WhatsApp course for a guide to similar processes.
Chatbot Setup(All Channels)
🤖 How to Set Up an AI Assistant to Answer Your Chats
🤖 What is an AI Assistant?
An AI Assistant is a smart chatbot that understands customer messages and replies naturally.
Step 1: Open Bot Manager
- Go to Bot Manager
- Select your account
Step 2: Enable AI Assistant
- Open AI Assistant
- Turn ON the Enabled toggle
Step 3: Create AI Training Campaign
- Click New
- Click Create
Step 4: Add System Prompt
- Give AI an identity and instructions
Step 5: Add Training Data
- Add URLs
- Add Files
- Add FAQs
Step 6: Save Campaign
Step 7: Connect Campaign
Step 8: Enable No-Match AI
🤖 How To Train Your AI Chatbot With Google Sheets
🤖 How To Train Your AI Chatbot With Google Sheets
Google Sheets training allows your AI chatbot to learn information directly from a spreadsheet. Instead of manually entering FAQs, you can organize questions and answers inside Google Sheets and let the AI use them automatically.
Step 1: Create a Google Sheet
• Open Google Sheets
• Create a new spreadsheet
• Add columns for Questions and Answers
Example:
Question: What services do you provide?
Answer: We provide Website Development, SEO, Google Ads, WhatsApp Marketing and Digital Marketing services.
Question: What is the starting price for website development?
Answer: Our website development services start from ₹5000.
Step 2: Save Your Data
• Add all FAQs into the sheet
• Save changes
Step 3: Connect Google Sheets
• Open DigiTech Bot Dashboard
• Go to Settings & Integration
• Open Google Sheet Integration
• Connect your Google account
Step 4: Select Your Sheet
• Choose your created spreadsheet
• Select the worksheet
Step 5: Add the Sheet to AI Training Campaign
• Open AI Training Campaign
• Select Google Sheets
• Choose your connected sheet
Step 6: Save and Train AI
• Click Save
• Wait for training to complete
🎉 Congratulations!
Your AI chatbot can now answer questions using information from your Google Sheet.
🤖 How to Set Up an Intent Detection Campaign For Your AI Assistant
🤖 How to Set Up An Intent Detection Campaign For Your AI Assistant
Intent Detection helps your AI understand what users want and automatically perform the right action. Instead of relying only on keywords, the AI identifies the user’s purpose and responds intelligently.
Example:
Customer: I’m facing an issue with your software
Action: Assign to Support Team
Customer: Can I request a new feature?
Action: Launch User Input Flow
Customer: How do I request a refund?
Action: AI responds using refund policy
Step 1: Open AI Assistant
• Go to Bot Manager
• Select your account
• Open AI Assistant
Step 2: Enable Intent Detection
• Turn ON the Intent Detection option
Step 3: Create a New Intent Campaign
• Click on Create
• Enter a campaign name
Examples:
• Technical Support
• Feature Request
• Refund Request
Step 4: Add Sample Sentences
Technical Support:
• I need technical assistance
• I’m facing an issue
• My software is not working
Feature Request:
• Can I request a new feature?
• I found a bug
• Are you planning to add new functions?
Refund Request:
• What is your refund policy?
• How can I request a refund?
• Can I get my money back?
Step 5: Select the Action
• Assign to Support Team
• Launch a Bot Flow
• Enable AI Responses
Step 6: Save the Campaign
🎉 Congratulations!
Your AI Assistant can now understand customer intentions and automatically trigger the correct action.
🤖 Creating a Keyword-Based Chatbot on the Visual Flow Builder
🤖 Creating a Keyword-Based Chatbot on the Visual Flow Builder
A keyword-based chatbot responds when users send specific words or phrases. It is useful for automating common questions and guiding users through predefined flows.
Example:
Customer: pricing
Bot: Here are our pricing details.
Customer: website
Bot: We provide website development services.
Step 1: Open Bot Manager
• Go to Bot Manager
• Select your account
• Open Bot Reply
Step 2: Create a New Bot
• Click on Create
• Open Visual Flow Builder
Step 3: Configure the Trigger
• Double-click on Start Bot Flow
• Enter trigger keywords
Example Keywords:
• website
• pricing
• SEO
• contact
• services
Step 4: Save Trigger Settings
• Click Save
Step 5: Add a Message Component
• Drag a Text Message component into the flow
• Connect it with Start Bot Flow
Step 6: Write the Bot Message
Example:
Hello! Welcome to DigiTech Bot.
We provide Website Development, SEO, Digital Marketing, Google Ads, and other services. How can we help you?
Step 7: Save and Publish
• Click Save
• Publish the bot
🎉 Congratulations!
Your keyword-based chatbot is now ready to respond automatically whenever users send matching keywords.
🤖 How to Create a Postback to Use in Any Chatbot
🤖 How to Create a Postback to Use in Any Chatbot
A Postback allows your chatbot buttons to trigger specific actions or open another flow automatically. Instead of users typing messages manually, they can simply click a button and continue the conversation.
Example:
Bot Message:
How can we help you?
Buttons:
• Website Development
• SEO Services
• Contact Support
If the user clicks “Website Development”, the chatbot automatically launches the website inquiry flow.
Step 1: Open Bot Manager
• Go to Bot Manager
• Select your account
• Open Bot Reply
Step 2: Create or Open a Bot Flow
• Click Create
• Open Visual Flow Builder
Step 3: Add a Button Component
• Drag a Button component into the flow
• Connect it with the message component
Step 4: Configure the Button
Example:
Button Text:
Website Development
Postback Value:
website_service
Button Text:
Contact Support
Postback Value:
contact_support
Step 5: Connect Actions
• Connect the button to another bot flow
• Or connect it to a message component
• Or transfer to a human agent
Step 6: Save and Publish
• Click Save
• Publish the bot
Example Flow:
Customer: Start
Bot:
How can we help you?
🔘 Website Development
🔘 SEO Services
🔘 Contact Support
🎉 Congratulations!
Your chatbot can now guide users using clickable buttons and automatic actions.
🤖 How to Send Multimedia Files using DigiTech Bot
🤖 How to Send Multimedia Files using DigiTech Bot
Multimedia files allow your chatbot to send images, videos, PDFs, audio files, and documents automatically. This helps improve user engagement and provides more interactive communication.
Example:
Customer: Send me your company profile
Bot:
📄 Company Profile PDF
Customer: Show me your services
Bot:
🖼 Service Image
🎥 Promotional Video
Step 1: Open Bot Manager
• Go to Bot Manager
• Select your account
• Open Bot Reply
Step 2: Create or Open a Bot Flow
• Click Create
• Open Visual Flow Builder
Step 3: Add a Multimedia Component
• Drag a Media/File component into the flow
• Connect it with the Start Bot Flow
Step 4: Upload Your File
Supported Files:
• Images (JPG, PNG)
• Videos (MP4)
• PDF Documents
• Audio Files
• Word Documents
Step 5: Add Optional Message
Example:
Hello! Please find our company profile and service details below.
Step 6: Save and Publish
• Click Save
• Publish the bot
🎉 Congratulations!
Your DigiTech Bot can now automatically send multimedia files to users.
🤖 How to Automatically Transfer from Chatbot to a Human Agent
🤖 How to Automatically Transfer from Chatbot to a Human Agent
This feature allows your chatbot to automatically transfer conversations to a real human agent whenever needed. It helps provide better support when the chatbot cannot handle a request.
Example:
Customer:
I need technical support
Bot:
Please wait while we connect you with our support team.
👨 Human Support Agent Joined
Step 1: Open Bot Manager
• Go to Bot Manager
• Select your account
• Open Bot Reply
Step 2: Create or Open a Bot Flow
• Click Create
• Open Visual Flow Builder
Step 3: Add a Human Agent Component
• Drag the Human Agent / Assign Agent component into the flow
• Connect it with Start Bot Flow
Step 4: Configure Team Assignment
• Select your support team
• Choose agent assignment settings
Assignment Options:
• Random Agent Assignment
• Specific Agent Assignment
• Team-Based Assignment
Step 5: Add Confirmation Message
Example:
Please wait. Our support team will contact you shortly.
Step 6: Save and Publish
• Click Save
• Publish the bot
Example Flow:
Customer:
I need help
Bot:
Please wait while we connect you with our support team.
👨 Human Agent Connected
🎉 Congratulations!
Your DigiTech Bot can now automatically transfer users from chatbot to human support agents.
🤖 How to Collect User Data Using User Input Flow
🤖 How to Collect User Data Using User Input Flow
User Input Flow allows your chatbot to collect customer information automatically through a series of questions. This helps you gather leads, contact details, and customer requirements without manual work.
Example:
Bot:
Please provide your details.
Question 1:
What is your name?
Question 2:
What is your phone number?
Question 3:
Which service are you interested in?
Customer:
John Smith
9876543210
Website Development
Bot:
Thank you! Our team will contact you shortly.
Step 1: Open Bot Manager
• Go to Bot Manager
• Select your account
• Open Bot Reply
Step 2: Create a New Flow
• Click Create
• Open Visual Flow Builder
Step 3: Add User Input Component
• Drag the User Input Flow component into the flow
• Connect it with Start Bot Flow
Step 4: Configure Questions
Examples:
Question:
What is your full name?
Type:
Text
Question:
What is your mobile number?
Type:
Phone Number
Question:
What service are you interested in?
Type:
Dropdown or Checkbox
Step 5: Save Answers to Custom Fields
• Create custom fields
• Map each answer to its field
Examples:
Name → Customer Name
Phone → Customer Mobile
Service → Interested Service
Step 6: Add a Confirmation Message
Example:
Thank you! Your details have been submitted successfully.
Step 7: Save and Publish
• Click Save
• Publish the bot
🎉 Congratulations!
Your DigiTech Bot can now automatically collect customer information and store it for future use.
🤖 Using Custom Variables to Personalize Your Chatbot Messages
🤖 Using Custom Variables to Personalize Your Chatbot Messages
Custom Variables allow your chatbot to use customer information dynamically inside messages. Instead of sending the same generic message to everyone, your chatbot can automatically insert customer details such as name, phone number, email, or selected service.
Example without Custom Variables:
Bot:
Hello! Welcome to DigiTech Bot.
Example with Custom Variables:
Bot:
Hello {first_name}! Welcome to DigiTech Bot.
Bot:
Thank you {first_name}. We received your request for {service_name}.
Step 1: Open Bot Manager
• Go to Bot Manager
• Select your account
• Open Bot Reply
Step 2: Create or Open a Bot Flow
• Click Create
• Open Visual Flow Builder
Step 3: Create Custom Fields
• Open Custom Fields
• Create required fields
Examples:
Customer Name
Phone Number
Interested Service
Email Address
Step 4: Store User Data
• Use User Input Flow
• Save answers into custom fields
Examples:
Name → {first_name}
Phone → {phone_number}
Service → {service_name}
Step 5: Use Variables in Messages
Examples:
Hello {first_name}
Your selected service is:
{service_name}
Our team will contact you on:
{phone_number}
Step 6: Save and Publish
• Click Save
• Publish the bot
🎉 Congratulations!
Your DigiTech Bot can now send personalized messages automatically using customer information.
🤖 How to troubleshoot errors in your chatbot
🤖 How to Troubleshoot Errors in Your Chatbot
If your chatbot is not responding correctly, triggers are not working, or messages are not being delivered, follow these troubleshooting steps to identify and fix common issues.
Common Problems:
❌ Bot is not replying
❌ Keywords are not working
❌ AI Assistant is not responding
❌ Flow is not triggering
❌ Messages are not being delivered
❌ Human agent transfer is not working
Step 1: Check Bot Status
• Go to Bot Manager
• Select your account
• Verify that your bot is enabled
Step 2: Check Trigger Keywords
• Open Bot Reply
• Verify trigger keywords
• Make sure there are no spelling mistakes
Example:
Correct:
website
pricing
support
Incorrect:
webiste
prcing
Step 3: Check AI Assistant Settings
• Open AI Assistant
• Confirm AI Assistant is enabled
• Verify the selected AI Campaign
Step 4: Check API Keys
• Go to Integrations
• Verify OpenAI or DeepSeek API keys
• Ensure available credits exist
Step 5: Check No-Match Settings
• Open Bot Manager → Settings
• Verify No Match Reply is enabled
Step 6: Test Your Flow
• Send test messages
• Check if the correct flow opens
Step 7: Check Connected Accounts
• Verify WhatsApp/Facebook/Instagram accounts are connected properly
Step 8: Save and Refresh
• Save all changes
• Refresh the page
• Test again
🎉 Troubleshooting Complete!
Your DigiTech Bot should now work correctly and respond as expected.
🤖 How to Configure Auto Response Settings in Bot Manager
🤖 How to Configure Auto Response Settings in Bot Manager
Auto Response settings allow your chatbot to automatically send messages when users interact with your business. These responses help provide quick replies, improve customer experience, and reduce manual work.
Examples:
Customer:
Hello
Bot:
Welcome to DigiTech Bot! How can we help you today?
Customer:
Thanks
Bot:
You’re welcome! Feel free to contact us anytime.
Step 1: Open Bot Manager
• Go to Bot Manager
• Select your account
Step 2: Open Settings
• Click on Settings inside Bot Manager
Step 3: Configure Welcome Message
• Enable Welcome Message
• Write your greeting message
Example:
Hello! Welcome to DigiTech Bot.
We provide Website Development, SEO, Digital Marketing, and Automation Services.
Step 4: Configure No-Match Response
• Enable No Match Reply
• Select Every Time
Example:
Sorry, I didn’t understand your request. Please try again or contact our support team.
Step 5: Configure Default Response
• Set a default reply for unknown queries
Step 6: Save Settings
• Click Save
Step 7: Test Your Bot
• Send a test message
• Verify responses
🎉 Congratulations!
Your DigiTech Bot can now automatically send responses to users and improve customer interactions.
🤖 How to Create and Configure a New Sequence for Your Chatbot
🤖 How to Create and Configure a New Sequence for Your Chatbot
A Sequence allows your chatbot to send automated messages in a specific order and timing. Sequences are useful for follow-ups, lead nurturing, appointment reminders, and customer engagement.
Example:
Day 1:
Welcome to DigiTech Bot!
Day 2:
Check out our Website Development services.
Day 3:
Get a special offer on our Digital Marketing services.
Step 1: Open Bot Manager
• Go to Bot Manager
• Select your account
Step 2: Open Sequence Settings
• Click on Sequences
• Click Create New Sequence
Step 3: Enter Sequence Details
Examples:
Sequence Name:
Customer Follow-up
Description:
Lead nurturing campaign
Step 4: Add Messages
Message 1:
Hello! Welcome to DigiTech Bot.
Message 2:
Explore our Website Development services.
Message 3:
Get started with our Digital Marketing solutions.
Step 5: Set Time Delay
Examples:
Message 1 → Send Immediately
Message 2 → Send after 1 Day
Message 3 → Send after 2 Days
Step 6: Configure Trigger
Trigger Examples:
• New User Registration
• Form Submission
• Button Click
• Specific Keyword
Step 7: Save and Activate
• Click Save
• Enable the sequence
Step 8: Test the Sequence
• Send a test message
• Verify message timing and flow
🎉 Congratulations!
Your DigiTech Bot can now automatically send follow-up messages and build engaging customer journeys.
💬 How to Use Live Chat with Shared Inbox: A Complete Guide
💬 How to Use Live Chat with Shared Inbox: A Complete Guide
Live Chat Shared Inbox allows multiple team members to manage customer conversations from a single dashboard. This helps businesses handle chats more efficiently and provide better customer support.
Example:
Customer:
I need information about website development services.
Support Agent:
Hello! Welcome to DigiTech Bot. How can I assist you today?
Step 1: Open Live Chat
• Log in to your DigiTech Bot Dashboard
• Click on Live Chat
Step 2: Open Shared Inbox
• Select Shared Inbox
• View all customer conversations
Step 3: Manage Customer Chats
• Open any conversation
• Read customer messages
• Reply directly
Step 4: Assign Conversations
• Assign chats to specific agents
• Transfer chats between team members if required
Step 5: Add Labels and Notes
Examples:
• New Lead
• Support Issue
• Premium Customer
Step 6: Track Chat History
• View previous messages
• Monitor conversation activity
Step 7: Save and Manage Chats
🎉 Congratulations!
You can now manage all customer conversations using Shared Inbox and improve team collaboration.
💬 Setting up Live Chat Translator and using it on DigiTech Bot
💬 Setting up Live Chat Translator and Using it on DigiTech Bot
Live Chat Translator allows support agents to automatically translate customer messages into their preferred language. This helps businesses communicate with customers from different countries without language barriers.
Example:
Customer:
Hola, necesito ayuda.
Agent View:
Hello, I need help.
Agent Reply:
Hello! How can I help you today?
Customer View:
¡Hola! ¿Cómo puedo ayudarte hoy?
Step 1: Open DigiTech Bot Dashboard
• Log in to your account
• Go to Live Chat Settings
Step 2: Open Translator Settings
• Locate Live Chat Translator
• Enable Translator Option
Step 3: Select Preferred Language
Examples:
• English
• Hindi
• Spanish
• French
• Arabic
Step 4: Save Settings
• Click Save
Step 5: Open Live Chat
• Open customer conversations
• Messages will automatically translate
Step 6: Test the Translation
• Send messages in different languages
• Verify translation results
Benefits:
• Communicate with global customers
• Remove language barriers
• Improve customer support experience
• Increase response efficiency
🎉 Congratulations!
You can now communicate with customers in multiple languages using DigiTech Bot Live Chat Translator.
💬 How to Use Canned Responses on the Live Chat
💬 How to Use Canned Responses on the Live Chat
Canned Responses are pre-written messages that help support agents reply quickly to common customer questions. Instead of typing the same answers repeatedly, you can save and reuse responses with a single click.
Example:
Customer:
What services do you provide?
Canned Response:
Hello! We provide Website Development, SEO, Digital Marketing, Google Ads, WhatsApp Marketing, and many other services.
Step 1: Open DigiTech Bot Dashboard
• Log in to your account
• Go to Live Chat
Step 2: Open Canned Responses
• Click on Settings
• Select Canned Responses
Step 3: Create a New Response
• Click Create New
• Enter a title
Example:
Title:
Website Services
Step 4: Write the Response Message
Example:
Hello! We provide Website Development, SEO, Digital Marketing, and other business growth solutions.
Step 5: Save Response
• Click Save
Step 6: Use Canned Responses in Live Chat
• Open any customer conversation
• Select the saved response
• Send instantly
Benefits:
• Save time
• Faster replies
• Consistent customer support
• Improved team efficiency
🎉 Congratulations!
You can now use Canned Responses to reply faster and improve customer support efficiency.
💬 Configure Signature Messages in Shared Team Live Chat
💬 Configure Signature Messages in Shared Team Live Chat
Signature Messages allow support agents to automatically add their names or custom signatures at the end of messages. This helps customers know who they are talking to and creates a more professional support experience.
Example:
Agent Message:
Hello! Thank you for contacting DigiTech Bot. How can I help you today?
Regards,
John
DigiTech Support Team
Step 1: Open DigiTech Bot Dashboard
• Log in to your account
• Go to Live Chat
Step 2: Open Shared Team Settings
• Select Team Settings
• Open Signature Message Settings
Step 3: Create Your Signature
Example:
Regards,
John Doe
DigiTech Support Team
OR
Thank you,
DigiTech Customer Support
Step 4: Configure Signature Options
• Enable Signature Message
• Choose whether signatures appear automatically
Step 5: Save Settings
• Click Save
Step 6: Test Live Chat
• Open a customer conversation
• Send a test message
• Verify the signature appears correctly
Benefits:
• Professional communication
• Better team identification
• Improved customer trust
• Consistent branding
🎉 Congratulations!
Your team can now automatically add professional signature messages in Live Chat conversations.
💬 How to Assign Conversations to Specific Agents
💬 How to Assign Conversations to Specific Agents
Assigning conversations to specific agents allows you to direct customer chats to the right team member based on their expertise. This improves customer support efficiency and ensures that users receive the correct assistance.
Example:
Customer:
I need help with website development.
Bot:
Please wait while we connect you with our Website Support Team.
👨 Conversation Assigned to: John (Website Support Agent)
Step 1: Open DigiTech Bot Dashboard
• Log in to your account
• Go to Live Chat
Step 2: Open Customer Conversations
• Select the conversation you want to assign
Step 3: Click on Assign Agent
• Locate the Assign option
• Click Assign Agent
Step 4: Select Team Member
Examples:
• Website Support Agent
• Technical Support Agent
• Sales Agent
• Customer Care Agent
Step 5: Save Assignment
• Click Save
Step 6: Verify Assignment
• Open the conversation
• Confirm the assigned agent name appears
Benefits:
• Faster issue resolution
• Better team management
• Improved customer support
• Assign chats based on expertise
🎉 Congratulations!
You can now assign customer conversations to specific agents and manage support more efficiently.
💬 How to Use the Subscriber Manager
💬 How to Use the Subscriber Manager
Subscriber Manager helps you manage all your customer information in one place. You can view subscribers, search users, edit customer details, apply labels, and monitor user activities.
Example:
Subscriber Name:
John Smith
Phone Number:
+91 9876543210
Interested Service:
Website Development
Status:
Active Lead
Step 1: Open DigiTech Bot Dashboard
• Log in to your account
• Go to Subscriber Manager
Step 2: View Subscribers
• Browse all subscribers
• View customer details
Step 3: Search for a Subscriber
• Use the search bar
• Enter customer name, phone number, or email
Step 4: View Subscriber Details
Examples:
• Name
• Phone Number
• Email Address
• Labels
• Custom Fields
• Conversation History
Step 5: Edit Subscriber Information
• Open subscriber profile
• Update required details
• Save changes
Step 6: Apply Filters and Labels
Examples:
• New Lead
• Premium Customer
• Interested in SEO
• Website Client
Step 7: Monitor Activities
• Check customer interactions
• View chatbot responses
• Track user actions
Benefits:
• Better customer management
• Easy lead tracking
• Organized subscriber data
• Improved customer engagement
🎉 Congratulations!
You can now manage and organize all customer information using Subscriber Manager.
💬 How to Assign or Remove Labels in DigiTech Bot
💬 How to Assign or Remove Labels in DigiTech Bot
Labels help you organize and categorize your subscribers and customer conversations. You can assign labels based on customer interests, support requests, lead status, or any custom category. Labels make it easier to filter and manage users.
Example Labels:
• New Lead
• Premium Customer
• Website Client
• SEO Interested
• Support Request
Step 1: Open DigiTech Bot Dashboard
• Log in to your account
• Go to Subscriber Manager
Step 2: Select a Subscriber
• Open the customer profile
• View subscriber details
Step 3: Assign a Label
• Locate the Labels section
• Click Add Label
Examples:
Customer:
John Smith
Assigned Labels:
• Website Development
• Premium Lead
Step 4: Save Changes
• Click Save
Step 5: Remove a Label
• Open subscriber profile
• Locate assigned labels
• Click the remove (X) icon beside the label
Step 6: Save Changes Again
• Click Save
Benefits:
• Better lead organization
• Easy customer filtering
• Faster team management
• Improved customer tracking
🎉 Congratulations!
You can now assign or remove labels in DigiTech Bot and organize your customer database efficiently.